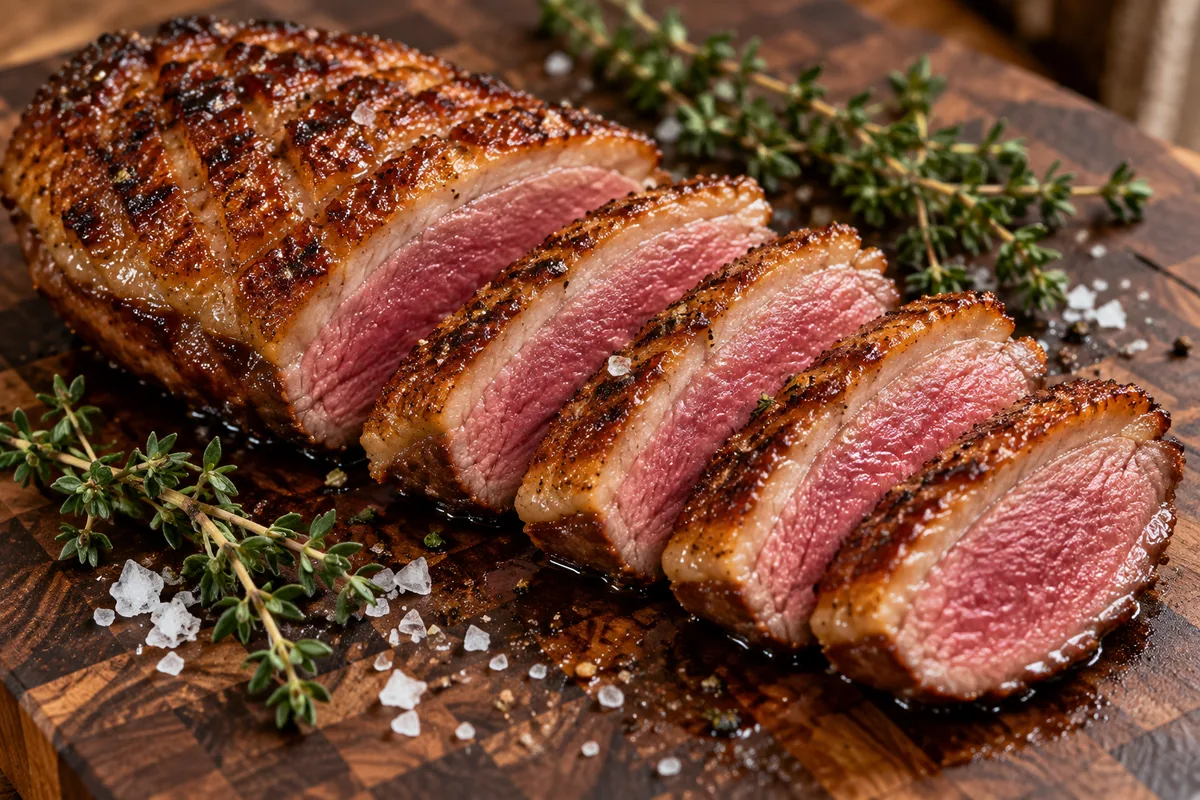
Sous vide duck breast temperature and texture matrix
| Doneness level | Bath temperature | Core color and texture | Culinary verdict |
|---|---|---|---|
| Rare | 125°F–129°F (52°C–54°C) | Deep crimson core, very soft, loose grain with chew resistance | Appeals to blue-rare duck fans; fat cap remains firm and spongy |
| Medium-Rare (Sweet spot) | 130°F–135°F (54.5°C–57°C) | Ruby-pink from edge to edge, velvety tender, intensely juicy | Ideal balance of tenderness and moisture; target 131°F (55°C) |
| Medium | 140°F (60°C) | Warm pink-tan center, noticeably firmer bite, less juice yield | Acceptable for hesitant diners, but meat loses delicate velvet chew |
| Well-Done (USDA Standard) | 165°F (74°C) | Uniform gray-tan throughout, dense, dry, and fibrous | Complies with USDA instantaneous poultry safety; sacrifices culinary moisture |
Duck breast looks, cooks, and behaves like red meat. Ducks are waterfowl engineered for sustained flight, so their pectoral muscles consist primarily of slow-twitch red muscle fibers packed with myoglobin and iron. Unlike the lean white breast meat discussed in our sous vide turkey breast guide, duck breast requires low-temperature culinary handling closer to a beef tenderloin or prime strip steak. Applying conventional poultry cooking methods to duck results in dry, liver-like meat.
Bath time and thickness rules
For standard boneless duck breasts—including domestic Pekin (Long Island) and rich Moulard (magret) cuts measuring 1.0 to 1.5 inches (25 mm to 38 mm) thick—the ideal water-bath window is 1.5 to 2 hours. This duration allows heat to reach the center of the breast completely and softens the dense muscle fibers without breaking down their structural integrity.
Bath timing requires respecting strict upper and lower limits:
- Minimum time: 45 to 60 minutes for thinner breasts (under 1 inch / 25 mm). Anything less leaves the core below target temperature.
- Ideal sweet spot: 90 minutes to 2 hours for standard 1.0- to 1.5-inch breasts starting from refrigerated temperature (38°F–41°F / 3°C–5°C). This allows heat to penetrate the geometric center and reach bath equilibrium.
- Maximum holding limit: 3.5 hours. Do not treat duck breast like tough beef chuck. Prolonged immersion past 3.5 hours triggers enzymatic breakdown, degrading the muscle grain into an unappealing, mealy, mushy texture.
Before lowering your bagged duck into the circulator, consult our sous vide thickness compatibility checklist to confirm that water can circulate freely on all sides without overcrowded bags creating cold spots.
The duck paradox: why the water bath cannot render fat
Precision immersion circulators solve the problem of overcooked poultry meat, but they expose an anatomical challenge unique to waterfowl: the thick subcutaneous fat cap. Duck breasts are insulated by a dense sheet of white fat beneath the skin. Rendering this dense fat into liquid and crisping the remaining skin requires sustained direct stovetop heat. At water-bath temperatures of 131°F to 135°F (55°C to 57°C), the fat cap merely warms into a flabby, rubbery blanket, while the skin remains pale and limp.
Home cooks often encounter a frustrating failure when attempting to finish sous vide duck: they pull the warm breast straight from the 131°F bath and drop it into a smoking-hot skillet. Because the red interior is already at its exact target temperature, intense pan heat immediately penetrates the meat, cooking the outer layers into a thick, dry gray ring (gray band) before the thick fat has enough time to render. Solving this paradox requires pre-bath skin scoring and a controlled cold-shock finishing protocol.
Step-by-step preparation and bagging protocol
Proper preparation before the bag touches the water ensures successful rendering on the stovetop later. Follow this preparation sequence carefully:
- Score the skin in a diamond pattern: Place the cold duck breast skin-side up on a stable cutting board. Using the razor-sharp tip of a chef’s knife or utility blade angled slightly, score parallel lines across the fat cap roughly 1/4-inch to 1/2-inch apart, then score diagonally across to create a diamond pattern. You should feel the blade glide cleanly through the waxy, chilled white fat with crisp resistance, halting precisely when the blade tip meets the red muscle. Never cut into the red flesh: piercing the muscle creates escape channels that allow savory internal juices to bleed out during searing, drying out the duck and causing grease splattering in the pan.
- Season the surfaces: Season both sides with coarse kosher salt and freshly cracked black pepper. Work salt crystals into the scored grooves to draw surface moisture out of the fat cap. Place a small sprig of fresh thyme or rosemary against the flesh side if desired. Do not add butter, olive oil, or heavy marinades to the bag; duck fat provides ample natural richness, and added fats dilute the distinct duck flavor.
- Seal the portion: Package one breast per bag. If you are using a vacuum sealer, select a gentle or manual pulse setting so the machine does not crush the natural contours of the breast or force out juices. Our guide to the best vacuum sealers for sous vide covers models with reliable pulse control. Alternatively, you can use a heavy-duty freezer zipper bag and remove the air using the water-displacement method detailed in our guide on how to sous vide without a vacuum sealer.
- Cook in a preheated bath: Lower the sealed bag into water heated to your target temperature (131°F / 55°C for medium-rare) and cook for 1.5 to 2 hours. If you need assistance setting up your container and immersion circulator, review our what is sous vide beginner guide.
The cold-shock pan-sear protocol: crackling skin without gray bands
This cold-shock rendering protocol provides a practical thermal buffer that allows you to render the fat cap slowly and crisp the skin thoroughly without pushing the interior past medium-rare.
Phase 1: The 5-minute ice bath chill
The moment the 1.5- to 2-hour cooking timer finishes, transfer the sealed bag immediately from the circulator into a bowl filled with equal parts cold water and ice cubes. Submerge the bag completely for approximately 5 minutes. This brief cold shock depresses the surface temperature of the skin and outermost muscle while leaving the interior core warm. This thermal cushion allows 3 to 5 minutes of active pan rendering in the skillet without immediately conducting heat into the rosy center.
Phase 2: Blot bone-dry
Remove the duck breast from the bag and discard any cooking liquid. Place the breast on multiple layers of heavy-duty paper towels and blot every surface thoroughly. Press paper towels into the scored crevices of the skin. Any residual surface moisture will flash into steam upon hitting the pan, capping the temperature at 212°F (100°C) and boiling the skin instead of rendering and crisping it.
Phase 3: Cold-skillet start over medium-low heat
Place the dried duck breast skin-side down in a cold, unheated skillet—cast iron or heavy stainless steel works best. Do not preheat the pan, and do not add cooking oil. Set the burner to medium-low heat. Starting in a cold pan allows the metal and the subcutaneous fat to warm up together gradually. This controlled thermal curve melts the fat slowly, giving it time to escape through the scored channels before the skin fibers harden and burn.
Phase 4: Active fat rendering and draining
Within two minutes, listen for a quiet, steady sizzle rather than an aggressive, sputtering roar. Look for clear, golden liquid duck fat pooling beneath the breast. As the liquid fat accumulates, tilt the skillet periodically and use a large spoon to draw off the excess fat into a heat-safe glass jar (strain and refrigerate this rendered duck fat for roasting potatoes or searing vegetables). Press down gently on the breast with a flat metal spatula to ensure the entire skin surface makes full, even contact with the pan. Maintain medium-low heat for 3 to 5 minutes until the skin turns a deep, glistening mahogany-bronze and sounds hollow and crisp when tapped with metal tongs.
Phase 5: Flash-sear the flesh side
Flip the breast over onto the flesh side. Sear for just 30 to 45 seconds. This brief contact lightly colors the surface and develops a delicate savory crust without driving heat into the interior muscle. Remove the breast immediately to a cutting board.
Phase 6: Rest and slice on a 45-degree bias
Allow the duck breast to rest uncovered on the cutting board for 5 minutes. This lets internal pressure normalize and allows the rendered fat cap to set its crisp structure. Place your chef’s knife at a 45-degree angle to the cutting board and slice across the grain into 1/3-inch thick medallions. A clean, audible crunch when slicing confirms the skin has rendered to paper-thin crispness while the interior remains ruby-pink and juicy.
Critical food safety boundaries and non-negotiables
Understanding the distinction between government safety baselines and precision culinary doneness is essential when preparing duck breast sous vide.
| Safety parameter | Standard guideline | Sous vide duck boundary | Actionable requirement |
|---|---|---|---|
| USDA poultry endpoint | 165°F (74°C) internal temp | 130°F–135°F (54.5°C–57°C) | USDA conventional guidance specifies 165°F (74°C) measured at the thickest part. Cooking at 130°F–135°F is a culinary texture choice that does not provide USDA pathogen elimination. |
| Starting temperature | Thawed cold meat (38°F–41°F / 3°C–5°C) | No frozen cooking | Always thaw completely in refrigerator before scoring and bagging. Never drop frozen duck breast directly into the bath. |
| Storage and chilling | Standard food storage | No cook-chill in vacuum bag | Cook and serve immediately. Do not chill cooked duck in its sealed pouch for multi-day storage; refrigerate leftovers only after unbagging under standard USDA rules. |
| Vulnerable populations | General food service | Strict 165°F compliance | Cook duck to the full USDA 165°F endpoint for pregnant individuals, elderly diners, and immunocompromised guests. |
The USDA FSIS guidance on duck and goose specifies cooking all poultry to a safe minimum internal temperature of 165°F (74°C) as measured with a food thermometer at the thickest part of the breast. Cooking duck breast at 131°F to 135°F is a culinary doneness choice that keeps dark waterfowl muscle succulent and pink, but it remains outside official USDA safety endpoints. Diners choosing low-temperature preparation must observe these strict operational boundaries:
- Never cook from frozen: Frozen-start cooking is excluded from this guide. Thick waterfowl fat and dense muscle require starting from fully thawed, refrigerated meat (38°F–41°F / 3°C–5°C) to ensure predictable heat transfer and accurate fat scoring.
- Cook and serve immediately: This guide is strictly scoped for immediate service. Do not store cooked duck in a sealed vacuum bag in the refrigerator for later days. Leftovers must be removed from the bag and stored according to standard refrigerated poultry guidelines (3 to 4 days at 40°F / 4°C or below).
- Do not hold beyond 3.5 hours: Holding boneless duck breast past 3.5 hours causes enzymatic breakdown that degrades muscle texture into an unappealing, mealy consistency. Remove the meat from the water bath within 1.5 to 2 hours.
Troubleshooting common duck breast mistakes
| Symptom | Root cause | Immediate correction |
|---|---|---|
| Flabby, rubbery, or pale skin | Pan started smoking hot, or skin was wet before searing | Start in a completely cold, dry skillet over medium-low heat; blot skin bone-dry with paper towels before cooking. |
| Thick gray overcooked band under skin | Skipped the cold-shock step; high heat penetrated rosy meat | Submerge the cooked sealed pouch in an ice water bath for 5 minutes before opening and searing. |
| Dry, chewy meat with violent pan splatter | Scored through the fat layer into the red pectoral muscle | Score only 80% through the fat cap; never allow the knife blade to cut into the red meat fibers. |
| Mealy, mushy, or liver-like texture | Water bath duration exceeded 3.5 to 4 hours | Limit total bath immersion to 1.5 to 2 hours for standard boneless duck breasts. |
| Skin burned before fat rendered | Flame set too high on stovetop; excess liquid fat not drained | Lower heat to medium-low; spoon out pooling liquid duck fat continuously during searing. |
Sources and methodology
This culinary guide synthesizes empirical sous vide thermodynamics, professional kitchen techniques, and authoritative food safety standards. It does not present original laboratory pathogen challenge tests. Safety boundaries reflect published guidance from the USDA Food Safety and Inspection Service (FSIS). Heat penetration timelines and muscle protein behavior are derived from Douglas Baldwin’s foundational research on sous vide cooking. Stovetop fat-rendering protocols and cold-shock procedures reflect verified culinary methodology established across benchmark culinary literature, including Serious Eats and professional poultry handling guides.
- USDA FSIS Safe Minimum Internal Temperature Chart — official 165°F (74°C) poultry endpoint.
- Douglas Baldwin, A Practical Guide to Sous Vide Cooking — thermal diffusivity and heating kinetics of intact muscle.
- Anova Culinary Duck Breast Guide — time and temperature texture benchmarks for waterfowl.
- Serious Eats (J. Kenji López-Alt) — subcutaneous fat scoring mechanics and pan-rendering principles.