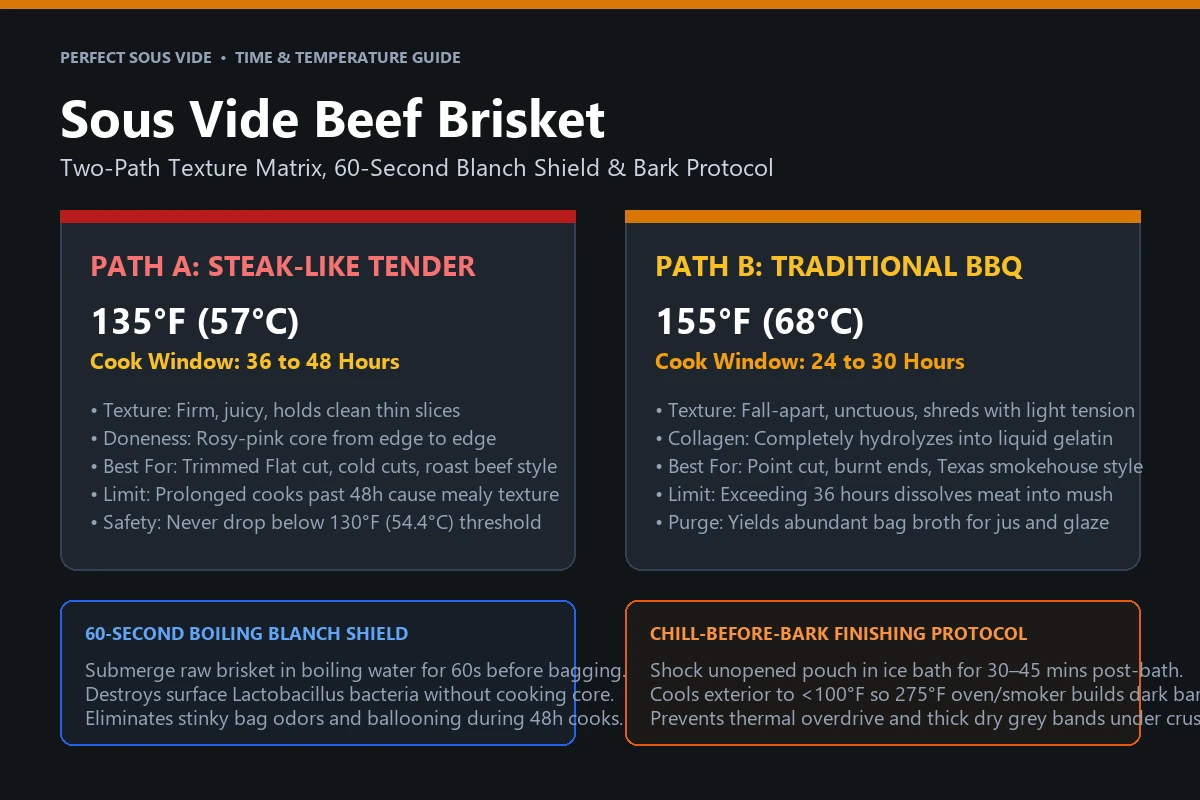
Sous Vide Brisket Temperature and Texture Matrix
Beef brisket is a heavily exercised pectoral cut loaded with dense Type I and Type III collagen, thick connective tissue sheaths, and intramuscular fat. In traditional barbecue pits, pitmasters cook brisket at 225°F to 275°F for 12 to 16 hours until the internal core hits 203°F (95°C), forcing rapid collagen breakdown but sacrificing considerable internal moisture. Precision sous vide separates collagen gelatinization from destructive core temperatures, giving you complete control over the final texture.
Unlike tender cuts such as ribeye or sirloin that cook in two to four hours, brisket requires prolonged thermal exposure to convert tough collagen into unctuous gelatin. The table below outlines the two primary cooking paths, along with critical processing limits and physical outcomes.
| Texture Goal | Water Bath Temperature | Recommended Cook Window | Internal Color & Structural Result | Safety & Process Limit |
|---|---|---|---|---|
| Steak-Like Tender (Sliceable) | 135°F (57°C) | 36 to 48 hours | Rosy pink from edge to edge; firm chew with low fiber separation; holds thin mechanical slices like roast beef. | Do not cook below 130°F (54.4°C); prolonged cooks past 48 hours cause structural collapse and mealy mouthfeel. |
| Traditional Texas BBQ (Pull-Apart) | 155°F (68°C) | 24 to 30 hours | Warm grey-brown interior; completely dissolved collagen; slices drape over a finger and shred with light tension. | Higher moisture purge into bag; do not exceed 36 hours or meat dissolves into stringy mush. |
| In-Between Hybrid (Soft Slice) | 145°F (63°C) | 30 to 36 hours | Faint pink hue; noticeably softer than 135°F but firmer than 155°F; balanced moisture retention and moderate shred. | Requires strict evaporation control due to 30+ hour duration in open containers. |
Choosing between 135°F and 155°F is not a matter of doneness preference—it is a choice between two completely different culinary experiences. At 135°F, muscle cell membranes retain significant cellular water while collagen slowly denatures over 36 to 48 hours. The result mimics high-end prime rib with an unusual density. At 155°F, the elevated thermal energy rapidly accelerates collagen hydrolysis into liquid gelatin, mimicking the unctuous mouthfeel of a wood-fired smokehouse.
Brisket Anatomy: Flat vs. Point and Whole Packer Management
A full untrimmed packer brisket weighs between 12 and 18 pounds and consists of two distinct overlapping muscles separated by a thick vein of hard intermuscular fat known as the deckle:
- The Flat (Pectoralis profundus): The large, lean, rectangular muscle that forms the bottom of the brisket. Its muscle fibers run in a uniform, parallel direction. Because the Flat has minimal intramuscular marbling, it is notoriously prone to drying out in dry-heat smokers. Under sous vide, the Flat excels at 135°F for clean, uniform slicing.
- The Point (Pectoralis superficialis): The smaller, thicker, highly marbled muscle that sits on top of the Flat. Its grain runs roughly 45 to 90 degrees diagonal to the Flat. The Point is rich in fat and connective tissue, making it the ideal candidate for 155°F cooking, shredded beef, or caramelized burnt ends.
If you purchase a full packer brisket, you face an operational decision: cook it whole or separate the two muscles before bagging. For standard home water baths, separating the Flat and Point along the natural fat seam is strongly recommended. Separating them allows each piece to fit into standard 11-inch vacuum sealer bags, shortens thermal recovery times, and lets you cook the Flat to 135°F for slicing while cooking the Point to 155°F for burnt ends.
Fat Cap Trimming and Deckle Removal
Sous vide water bath temperatures (135°F–155°F) are insufficient to melt or render hard subcutaneous beef tallow. Leaving a thick, untrimmed layer of fat on your brisket will yield a greasy, rubbery white band that dampens seasoning absorption and prevents crust adhesion during finishing.
Follow these mechanical trimming rules while the beef is thoroughly chilled directly from the refrigerator:
- Excise the Deckle: Locate the hard, chalky white fat pocket located on the inner curve between the Flat and the Point. This fat will never soften or render at sous vide temperatures. Use a curved boning knife to completely slice out this hard fat core until you expose clean meat.
- Trim the Subcutaneous Fat Cap to 1/4 Inch: On the exterior fat side, trim down excess fat until a uniform 1/4-inch (6 mm) layer remains. A 1/4-inch fat cap provides adequate thermal insulation and moisture during the finishing oven sear without leaving a thick rubbery layer.
- Remove the Silver Skin on the Flat: Flip the brisket over to the lean side. Shave away the silver skin and ragged loose meat flaps. Silver skin forms an impermeable moisture barrier that blocks salt and spice penetration.
- Round Off Sharp Edges: Aerodynamic, rounded corners cook more evenly and are far less likely to puncture heavy vacuum bags during multi-day handling.
The 60-Second Boiling Blanch Shield (Eliminating Bag Odors)
The single most common complaint among home cooks attempting 36- to 48-hour beef cooks is the “stinky bag” phenomenon. When pulling a brisket from the bath after two days, the vacuum bag may appear puffy or ballooned with gas, and cutting it open releases a pungent, sour smell reminiscent of fermented cheese or dirty gym socks.
This odor is caused by Lactobacillus species and other harmless, facultative anaerobic bacteria that naturally inhabit the exterior surface of raw primal cuts. While safe from a culinary toxin perspective, these bacteria survive and slowly ferment sugars at temperatures between 130°F and 138°F, releasing carbon dioxide gas and lactic acid.
You can completely eliminate this issue by executing the 60-Second Boiling Blanch Shield:
- Bring a large stockpot of plain water to a rapid, rolling boil (212°F / 100°C).
- Using sturdy stainless-steel tongs, lower the trimmed, unseasoned brisket into the boiling water for exactly 30 to 60 seconds.
- Ensure all exterior surface areas, folds, and edges contact the boiling water.
- Remove the brisket immediately and transfer it to a clean cutting board.
Because thermal conductivity in dense beef is limited over a 60-second exposure, heat penetrates less than 1 millimeter below the surface. The exterior turns pale grey, but the interior remains completely raw. This instantaneous thermal shock pasteurizes surface microbes, guaranteeing that your bag remains tight, clean, and completely odor-free throughout a 48-hour immersion.
Bagging, Sealing, and Water Bath Management for Multi-Day Cooks
Cooking an 8- to 12-pound roast for 24 to 48 hours introduces physical friction points that do not exist during brief two-hour cooks. Managing these variables ensures consistent results and protects your equipment.
Sealing Large Cuts Securely
Due to the size and weight of beef brisket, standard lightweight zipper-lock bags and the water-displacement method can be difficult to manage. For multi-day stability, use heavy-duty 4-mil or 5-mil embossed vacuum bags designed for the best vacuum sealers for sous vide. Inspect the seal line thoroughly for wrinkles or moisture paths. Double-sealing both ends provides extra security against seam failure during extended hot-water holding.
Preventing Bag Floating and Uneven Heating
As collagen breaks down over 24 to 48 hours, micro-bubbles of water vapor can accumulate inside the bag. Even a slightly buoyant bag will rise to the surface, exposing the upper section of meat to ambient room air and dropping that zone into the bacterial growth range. Consult our dedicated guide on sous vide bag floating to understand displacement physics. Anchor the brisket completely under water using commercial sous vide racks, weights, and clips or a heavy stainless-steel trivet placed across the bag.
Managing Evaporation and Container Capacity
A water bath running at 135°F–155°F will lose 1 to 2 gallons of water every 24 hours through open evaporation. If the water level drops below your circulator’s minimum sensor line, the heating element shuts off automatically. If this occurs overnight while you sleep, the bath will cool into the bacterial danger zone (40°F–130°F), forcing you to discard the entire cut.
Always cook multi-day roasts in dedicated 12- to 18-quart polycarbonate baths selected from our review of the best sous vide containers. Fit the container with a precision-cut silicone lid, double layers of heavy aluminum foil, or floating polypropylene insulation balls to minimize moisture loss.
The Chill-Before-Bark Protocol (Smoker and Oven Finishing)
The primary critique of sous vide barbecue is the lack of a deep, crunchy, mahogany bark. When a brisket emerges from a vacuum pouch, its surface is wet, grey, and completely unappealing. Searing it immediately under a hot broiler or tossing it into a smoker leads to severe thermal overdrive: the interior overcooks past well-done (>165°F), creating a thick, dry grey band under the crust.
The solution is the Chill-Before-Bark Protocol, which uses thermal gradient physics to protect the interior while you rebuild the crust:
- The Ice-Water Shock: Remove the sealed brisket from the hot water bath. Immediately submerge the unopened pouch in an ice bath (equal parts water and ice) for 30 to 45 minutes. Alternatively, transfer the bag to the refrigerator for 2 to 4 hours. This lowers the outer 1/2-inch of meat to below 90°F–100°F (32°C–38°C) while keeping the core safely warm.
- Dry the Surface Thoroughly: Cut open the bag and reserve the accumulated bag juices for jus or barbecue sauce. Transfer the cold brisket to a wire rack set over a rimmed baking sheet. Blot the exterior with heavy paper towels until the surface is matte and tacky. Any remaining surface water will turn to steam, preventing the Maillard reaction.
- Re-Apply Seasoning Rub: Apply a light layer of yellow mustard or beef tallow as a binder, then coat heavily with coarse 16-mesh black pepper and kosher salt (classic Dalmation rub).
- Finish in the Oven or Smoker:
- Oven Method: Preheat your oven to 275°F to 300°F (135°C to 150°C). Roast on the wire rack for 1.5 to 2 hours until a crisp, dark bark forms.
- Smoker Method: Set your smoker to 225°F to 250°F (107°C to 121°C) with post oak, hickory, or pecan wood. Smoke for 2 to 3 hours until the bark is deeply lacquered and fragrant.
Because the exterior meat was chilled beforehand, it absorbs intense convective dry heat to develop a crunchy bark while the protected interior gently warms back up to optimal serving temperature without overcooking.
Food Safety and Multi-Day Thermal Boundaries
Operating a water bath for 24 to 48 hours requires strict adherence to food safety parameters established by Douglas Baldwin and the USDA Food Safety and Inspection Service (FSIS):
- The 130°F (54.4°C) Safety Floor: While rare steaks can be safely cooked at 125°F–129°F for up to 2.5 hours, never cook brisket below 130°F. In multi-day cooks, operating below 130°F allows spore-forming anaerobic pathogens, specifically Clostridium perfringens and Bacillus cereus, to multiply rapidly in the low-oxygen pouch.
- Logarithmic Pasteurization: A 36-hour bath held at 135°F achieves complete commercial pasteurization, destroying more than 7-log10 of Salmonella and 6-log10 of E. coli throughout the entire thickness of the meat.
- Cook-Chill Guidelines for Make-Ahead Meals: Brisket is an ideal cut for batch cooking. If you are not serving immediately after the water bath, do not leave the pouch on the counter at room temperature. Submerge the sealed pouch in an ice-water slurry until the internal core drops below 41°F (5°C) within 2 hours. Store refrigerated for up to 5 days, or freeze for up to 6 months before reheating.
Before planning your session, confirm your meat dimensions against our sous vide compatibility checklist to verify heat penetration times and container clearance.
Troubleshooting Common Sous Vide Brisket Mistakes
If your brisket does not meet expectations, diagnose the root cause using this failure mode matrix:
| Observable Defect | Primary Root Cause | Corrective Action for Next Cook |
|---|---|---|
| Bag ballooned with sour, cheesy aroma | Surface Lactobacillus bacteria survived and fermented sugars during a multi-day cook below 138°F. | Execute the 60-Second Boiling Blanch Shield before seasoning and bagging. |
| Thick, dry grey band beneath the crust | Brisket was transferred straight from the 155°F water bath into a hot oven or smoker without cooling. | Submerge bag in an ice bath for 30–45 minutes to drop surface temperature before barking. |
| Chewy, unrendered fat cap | Excessive subcutaneous fat was left on the roast; beef tallow cannot render at 135°F. | Trim fat cap down to a uniform 1/4 inch and completely excise the hard deckle pocket. |
| Mealy, mushy, dry meat fibers | Cooking duration was extended past the enzymatic breakdown threshold (exceeding 48 hours at 135°F or 36 hours at 155°F). | Cap 135°F cooks at 48 hours maximum, and 155°F cooks at 30 hours maximum. |
| Circulator alarm and cold bath in the morning | Water evaporated below the minimum fill line, triggering low-water safety shutdown. | Use a container fitted with a tailored lid or cover completely with insulation balls. |
Carving, Grain Direction, and Serving Texas-Style
Proper carving technique is critical. Slicing with the muscle grain results in stringy, chewy bites, even on a perfectly cooked brisket. Because the Flat and Point grain directions run perpendicular to each other, follow this sequential carving method:
- Let the Bark Settle: After oven or smoker finishing, rest the brisket on a cutting board for 15 minutes to allow surface juices to stabilize.
- Separate the Muscles (If Cooked Whole): Slice horizontally through the residual fat seam connecting the Flat and Point, setting the Point aside.
- Carve the Flat Across the Grain: Inspect the exposed muscle fibers of the Flat. Slice perpendicular across the grain into clean pencils-thick slices (roughly 1/4 inch / 6 mm). Thin slices hold together cleanly at 135°F, while slightly thicker slices prevent falling apart at 155°F.
- Rotate and Carve the Point: Rotate the Point 90 degrees to align with its opposing grain direction. Slice into 3/8-inch slices, or cube into 1-inch squares for burnt ends.
- Re-Hydrate with Bag Juices: Skim excess rendered fat from the reserved pouch liquid, season with a pinch of black pepper, and drizzle warm broth over the carved meat before serving.
To explore how brisket compares to other beef cuts and cooking methods, review our guides on sous vide chuck roast, sous vide tri tip, and the fundamental rules in our sous vide steak temperature guide.